微信小程序开发 |
您所在的位置:网站首页 › 星空 小程序 › 微信小程序开发 |
微信小程序开发
|
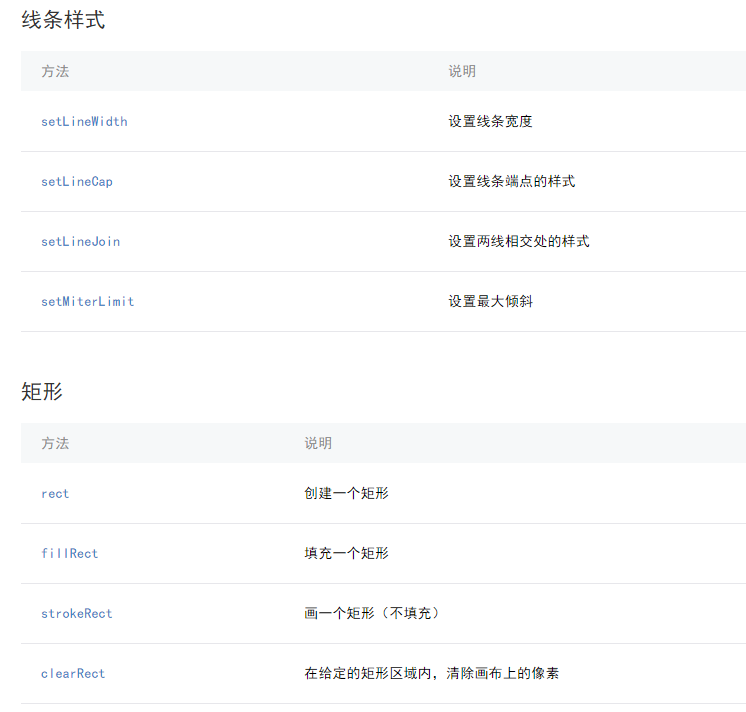
一.小知识 (1).API接口
(2).context 对象的方法列表
二.步骤 wxml中:
在js文件onLoad: function() {}的方法中开始编写代码
1.创建一个 Canvas 绘图上下文 CanvasContext const ctx = wx.createCanvasContext('myCanvas')
2.们来描述要在 Canvas 中绘制什么内容(绘图描述) ①.样式的描述 ctx.setFillStyle('red') ②形状描述:填充矩形,描边矩形,圆,线段等 ctx.fillRect(10, 10, 150, 75)
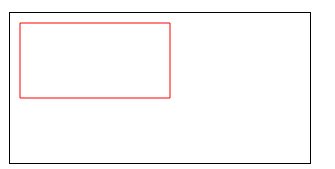
3.绘制 ctx.draw() 三.效果wxml中: (1).绘制矩形:参数都是(起点x1,起点y1,宽度,长度) ①填充矩形 填充颜色:setFillStyle('red') 填充矩形:ctx.fillRect(10, 10, 150, 75)或是ctx.rect(10, 10, 150, 75) 如果没有填充颜色,则默认是黑色 js文件中 const ctx = wx.createCanvasContext('myCanvas') ctx.setFillStyle('red') ctx.fillRect(10, 10, 150, 75) ctx.draw() 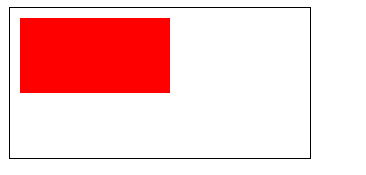 ②描边矩形
描边颜色:ctx.setStrokeStyle('red')
描边矩形:setFillStroke()
const ctx = wx.createCanvasContext('myCanvas')
ctx.setStrokeStyle('red')
ctx.strokeRect(10, 10, 150, 75)
ctx.draw()
②描边矩形
描边颜色:ctx.setStrokeStyle('red')
描边矩形:setFillStroke()
const ctx = wx.createCanvasContext('myCanvas')
ctx.setStrokeStyle('red')
ctx.strokeRect(10, 10, 150, 75)
ctx.draw()
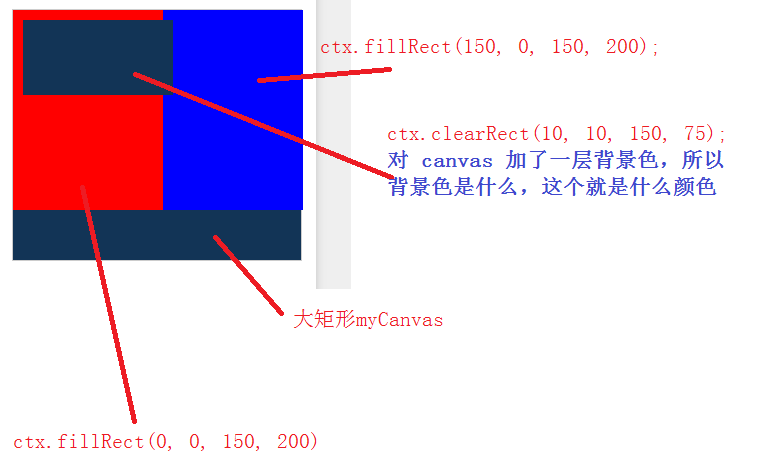
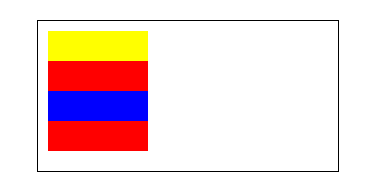
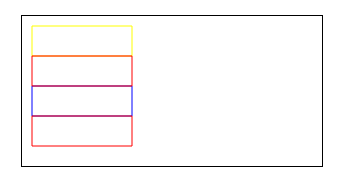
  加了一层背景色
wxml中:
js中:
onLoad: function() {
const ctx = wx.createCanvasContext('myCanvas');
ctx.setFillStyle('red');
ctx.fillRect(0, 0, 150, 200);
ctx.setFillStyle('blue');
ctx.fillRect(150, 0, 150, 200);
ctx.clearRect(10, 10, 150, 75);
ctx.draw();
} 加了一层背景色
wxml中:
js中:
onLoad: function() {
const ctx = wx.createCanvasContext('myCanvas');
ctx.setFillStyle('red');
ctx.fillRect(0, 0, 150, 200);
ctx.setFillStyle('blue');
ctx.fillRect(150, 0, 150, 200);
ctx.clearRect(10, 10, 150, 75);
ctx.draw();
}
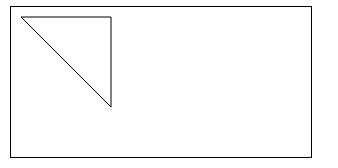
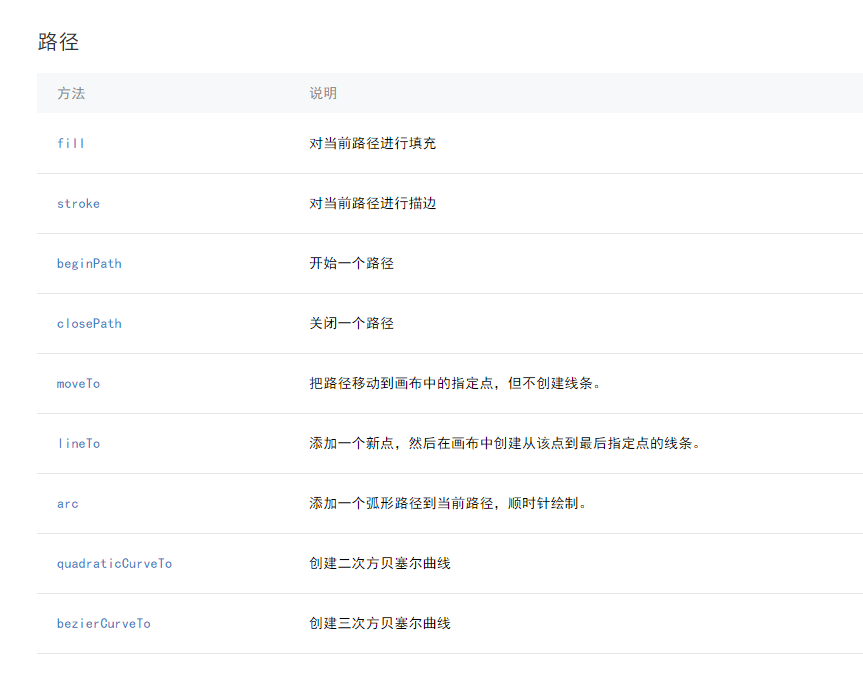
 (2).路径
ctx.moveTo(10, 10):把路径移动到画布中的指定点
ctx.lineTo(110, 60):增加一个新点,然后创建一条从上次指定点到目标点的线
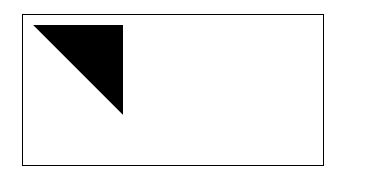
ctx.fill():填充
1.填充
对当前路径中的内容进行填充。默认的填充色为黑色。 Tip: 如果当前路径没有闭合,fill() 方法会将起点和终点进行连接,然后填充。
const ctx = wx.createCanvasContext('myCanvas')
ctx.moveTo(10, 10)
ctx.lineTo(100, 10)
ctx.lineTo(100, 100)
ctx.fill()
ctx.draw()
(2).路径
ctx.moveTo(10, 10):把路径移动到画布中的指定点
ctx.lineTo(110, 60):增加一个新点,然后创建一条从上次指定点到目标点的线
ctx.fill():填充
1.填充
对当前路径中的内容进行填充。默认的填充色为黑色。 Tip: 如果当前路径没有闭合,fill() 方法会将起点和终点进行连接,然后填充。
const ctx = wx.createCanvasContext('myCanvas')
ctx.moveTo(10, 10)
ctx.lineTo(100, 10)
ctx.lineTo(100, 100)
ctx.fill()
ctx.draw()
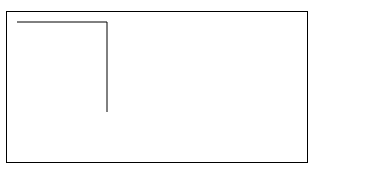
 Tip: fill() 填充的的路径是从 beginPath() 开始计算,但是不会将 fillRect() 包含进去。
const ctx = wx.createCanvasContext('myCanvas')
// begin path
ctx.rect(10, 10, 100, 30)
ctx.setFillStyle('yellow')
ctx.fill()
// begin another path
ctx.beginPath()
ctx.rect(10, 40, 100, 30)
// only fill this rect, not in current path
ctx.setFillStyle('blue')
ctx.fillRect(10, 70, 100, 30)
ctx.rect(10, 100, 100, 30)
// it will fill current path
ctx.setFillStyle('red')
ctx.fill()
ctx.draw()
Tip: fill() 填充的的路径是从 beginPath() 开始计算,但是不会将 fillRect() 包含进去。
const ctx = wx.createCanvasContext('myCanvas')
// begin path
ctx.rect(10, 10, 100, 30)
ctx.setFillStyle('yellow')
ctx.fill()
// begin another path
ctx.beginPath()
ctx.rect(10, 40, 100, 30)
// only fill this rect, not in current path
ctx.setFillStyle('blue')
ctx.fillRect(10, 70, 100, 30)
ctx.rect(10, 100, 100, 30)
// it will fill current path
ctx.setFillStyle('red')
ctx.fill()
ctx.draw()
 2.描边
画出当前路径的边框。默认颜色色为黑色。
const ctx = wx.createCanvasContext('myCanvas')
ctx.moveTo(10, 10)
ctx.lineTo(100, 10)
ctx.lineTo(100, 100)
ctx.stroke()
ctx.draw()
2.描边
画出当前路径的边框。默认颜色色为黑色。
const ctx = wx.createCanvasContext('myCanvas')
ctx.moveTo(10, 10)
ctx.lineTo(100, 10)
ctx.lineTo(100, 100)
ctx.stroke()
ctx.draw()
 Tip: stroke() 描绘的的路径是从 beginPath() 开始计算,但是不会将 strokeRect() 包含进去.
const ctx = wx.createCanvasContext('myCanvas')
// begin path
ctx.rect(10, 10, 100, 30)
ctx.setStrokeStyle('yellow')
ctx.stroke()
// begin another path
ctx.beginPath()
ctx.rect(10, 40, 100, 30)
// only stoke this rect, not in current path
ctx.setStrokeStyle('blue')
ctx.strokeRect(10, 70, 100, 30)
ctx.rect(10, 100, 100, 30)
// it will stroke current path
ctx.setStrokeStyle('red')
ctx.stroke()
ctx.draw() Tip: stroke() 描绘的的路径是从 beginPath() 开始计算,但是不会将 strokeRect() 包含进去.
const ctx = wx.createCanvasContext('myCanvas')
// begin path
ctx.rect(10, 10, 100, 30)
ctx.setStrokeStyle('yellow')
ctx.stroke()
// begin another path
ctx.beginPath()
ctx.rect(10, 40, 100, 30)
// only stoke this rect, not in current path
ctx.setStrokeStyle('blue')
ctx.strokeRect(10, 70, 100, 30)
ctx.rect(10, 100, 100, 30)
// it will stroke current path
ctx.setStrokeStyle('red')
ctx.stroke()
ctx.draw()
 注意:
创建路径:ctx.beginPath()和ctx.closePath()
①.开始创建路径:ctx.beginPath()
开始创建一个路径,需要调用fill或者stroke才会使用路径进行填充或描边。 Tip: 在最开始的时候相当于调用了一次 beginPath()。 Tip: 同一个路径内的多次setFillStyle()、setStrokeStyle()、setLineWidth()等设置,以最后一次设置为准。
②.关闭路径:ctx.closePath() Tip: 关闭路径会连接起点和终点。 Tip: 如果关闭路径后没有调用 fill() 或者 stroke() 并开启了新的路径,那之前的路径将不会被渲染。
const ctx = wx.createCanvasContext('myCanvas')
ctx.moveTo(10, 10)
ctx.lineTo(100, 10)
ctx.lineTo(100, 100)
ctx.closePath()
ctx.stroke()
ctx.draw()
注意:
创建路径:ctx.beginPath()和ctx.closePath()
①.开始创建路径:ctx.beginPath()
开始创建一个路径,需要调用fill或者stroke才会使用路径进行填充或描边。 Tip: 在最开始的时候相当于调用了一次 beginPath()。 Tip: 同一个路径内的多次setFillStyle()、setStrokeStyle()、setLineWidth()等设置,以最后一次设置为准。
②.关闭路径:ctx.closePath() Tip: 关闭路径会连接起点和终点。 Tip: 如果关闭路径后没有调用 fill() 或者 stroke() 并开启了新的路径,那之前的路径将不会被渲染。
const ctx = wx.createCanvasContext('myCanvas')
ctx.moveTo(10, 10)
ctx.lineTo(100, 10)
ctx.lineTo(100, 100)
ctx.closePath()
ctx.stroke()
ctx.draw()
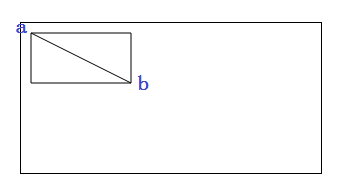
 3.线段:moveTo(10, 10),lineTo(110, 60)参数都是点的坐标
const ctx = wx.createCanvasContext('myCanvas')
ctx.moveTo(10, 10)
ctx.rect(10, 10, 100, 50)
ctx.lineTo(110, 60)
ctx.stroke()
ctx.draw()
3.线段:moveTo(10, 10),lineTo(110, 60)参数都是点的坐标
const ctx = wx.createCanvasContext('myCanvas')
ctx.moveTo(10, 10)
ctx.rect(10, 10, 100, 50)
ctx.lineTo(110, 60)
ctx.stroke()
ctx.draw()
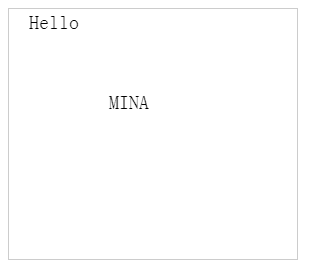
  5.文字
ctx.setFontSize(20):字体的大小
ctx.setTextAlign('left');设置文字的对齐left,right,center
ctx.fillText('文字', 文字在画布中起点x1,起点y1):在画布上绘制被填充的文本。
const ctx = wx.createCanvasContext('myCanvas')
ctx.setFontSize(20)
ctx.fillText('Hello', 20, 20)
ctx.fillText('MINA', 100, 100)
ctx.draw()
5.文字
ctx.setFontSize(20):字体的大小
ctx.setTextAlign('left');设置文字的对齐left,right,center
ctx.fillText('文字', 文字在画布中起点x1,起点y1):在画布上绘制被填充的文本。
const ctx = wx.createCanvasContext('myCanvas')
ctx.setFontSize(20)
ctx.fillText('Hello', 20, 20)
ctx.fillText('MINA', 100, 100)
ctx.draw()
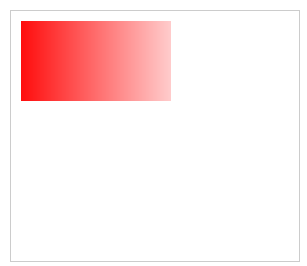
 6.渐变
grd.addColorStop(渐变点在起点和终点中的位置, '颜色'):颜色渐变 Tip: 小于最小 stop 的部分会按最小 stop 的 color 来渲染,大于最大 stop 的部分会按最大 stop 的 color 来渲染。 Tip: 需要使用 addColorStop() 来指定渐变点,至少要两个。
①线性渐变:ctx.createLinearGradient(起点x1, 起点y1, 终点x2,终点y2) Tip: 需要使用 addColorStop() 来指定渐变点,至少要两个
onLoad: function() {
const ctx = wx.createCanvasContext('myCanvas')
// 创建线性渐变
const grd = ctx.createLinearGradient(0, 0, 200, 0)
grd.addColorStop(0, 'red')
grd.addColorStop(1, 'white')
// 绘制图形
ctx.setFillStyle(grd)
ctx.fillRect(10, 10, 150, 80)
ctx.draw()
}
6.渐变
grd.addColorStop(渐变点在起点和终点中的位置, '颜色'):颜色渐变 Tip: 小于最小 stop 的部分会按最小 stop 的 color 来渲染,大于最大 stop 的部分会按最大 stop 的 color 来渲染。 Tip: 需要使用 addColorStop() 来指定渐变点,至少要两个。
①线性渐变:ctx.createLinearGradient(起点x1, 起点y1, 终点x2,终点y2) Tip: 需要使用 addColorStop() 来指定渐变点,至少要两个
onLoad: function() {
const ctx = wx.createCanvasContext('myCanvas')
// 创建线性渐变
const grd = ctx.createLinearGradient(0, 0, 200, 0)
grd.addColorStop(0, 'red')
grd.addColorStop(1, 'white')
// 绘制图形
ctx.setFillStyle(grd)
ctx.fillRect(10, 10, 150, 80)
ctx.draw()
}
 ②圆形渐变:ctx.createCircularGradient(圆点x,圆点y,半径) Tip: 起点在圆心,终点在圆环。 Tip: 需要使用 addColorStop() 来指定渐变点,至少要两个。
onLoad: function() {
const ctx = wx.createCanvasContext('myCanvas')
// 创建圆形渐变
const grd = ctx.createCircularGradient(75, 50, 40)
grd.addColorStop(0, 'red')
grd.addColorStop(1, 'white')
// 绘制图形
ctx.setFillStyle(grd)
ctx.fillRect(10, 10, 150, 100)
ctx.draw()
}
②圆形渐变:ctx.createCircularGradient(圆点x,圆点y,半径) Tip: 起点在圆心,终点在圆环。 Tip: 需要使用 addColorStop() 来指定渐变点,至少要两个。
onLoad: function() {
const ctx = wx.createCanvasContext('myCanvas')
// 创建圆形渐变
const grd = ctx.createCircularGradient(75, 50, 40)
grd.addColorStop(0, 'red')
grd.addColorStop(1, 'white')
// 绘制图形
ctx.setFillStyle(grd)
ctx.fillRect(10, 10, 150, 100)
ctx.draw()
}
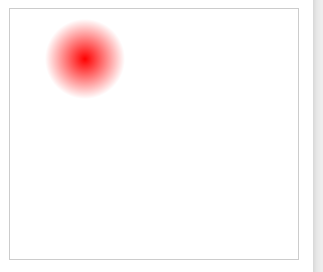 7.阴影:ctx.setShadow(阴影x偏移, 阴影y偏移,模糊级别,数值越大越模糊, '颜色') Tip: 如果没有设置,offsetX 默认值为0, offsetY 默认值为0, blur 默认值为0,color 默认值为 black。
const ctx = wx.createCanvasContext('myCanvas')
ctx.setFillStyle('red')
ctx.setShadow(10, 50, 50, 'blue')
ctx.fillRect(10, 10, 150, 75)
ctx.draw()
7.阴影:ctx.setShadow(阴影x偏移, 阴影y偏移,模糊级别,数值越大越模糊, '颜色') Tip: 如果没有设置,offsetX 默认值为0, offsetY 默认值为0, blur 默认值为0,color 默认值为 black。
const ctx = wx.createCanvasContext('myCanvas')
ctx.setFillStyle('red')
ctx.setShadow(10, 50, 50, 'blue')
ctx.fillRect(10, 10, 150, 75)
ctx.draw()
 8.旋转
①scale(x,y)方法对横纵坐标进行缩放:多次调用scale,倍数会相乘。
const ctx = wx.createCanvasContext('myCanvas')
ctx.strokeRect(10, 10, 25, 15)
ctx.scale(2, 2)
ctx.strokeRect(10, 10, 25, 15)
ctx.scale(2, 2)
ctx.strokeRect(10, 10, 25, 15)
ctx.draw()
8.旋转
①scale(x,y)方法对横纵坐标进行缩放:多次调用scale,倍数会相乘。
const ctx = wx.createCanvasContext('myCanvas')
ctx.strokeRect(10, 10, 25, 15)
ctx.scale(2, 2)
ctx.strokeRect(10, 10, 25, 15)
ctx.scale(2, 2)
ctx.strokeRect(10, 10, 25, 15)
ctx.draw()
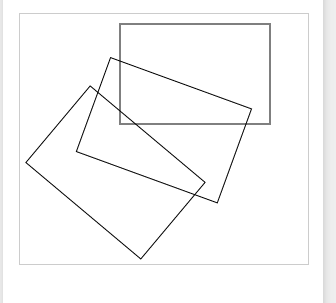
 ②ctx.rotate(旋转的角度):对坐标轴进行顺时针旋转. 以弧度计(degrees * Math.PI/180;degrees范围为0~360) 以原点为中心,原点可以用 translate方法修改。顺时针旋转当前坐标轴。多次调用rotate,旋转的角度会叠加。
const ctx = wx.createCanvasContext('myCanvas')
ctx.strokeRect(100, 10, 150, 100)
ctx.rotate(20 * Math.PI / 180)
ctx.strokeRect(100, 10, 150, 100)
ctx.rotate(20 * Math.PI / 180)
ctx.strokeRect(100, 10, 150, 100)
ctx.draw()
②ctx.rotate(旋转的角度):对坐标轴进行顺时针旋转. 以弧度计(degrees * Math.PI/180;degrees范围为0~360) 以原点为中心,原点可以用 translate方法修改。顺时针旋转当前坐标轴。多次调用rotate,旋转的角度会叠加。
const ctx = wx.createCanvasContext('myCanvas')
ctx.strokeRect(100, 10, 150, 100)
ctx.rotate(20 * Math.PI / 180)
ctx.strokeRect(100, 10, 150, 100)
ctx.rotate(20 * Math.PI / 180)
ctx.strokeRect(100, 10, 150, 100)
ctx.draw()
 ③translate(x坐标平移量,y坐标平移量)对坐标原点进行缩放
const ctx = wx.createCanvasContext('myCanvas')
ctx.strokeRect(10, 10, 150, 100)
ctx.translate(20, 20)
ctx.strokeRect(10, 10, 150, 100)
ctx.translate(20, 20)
ctx.strokeRect(10, 10, 150, 100)
ctx.draw()
③translate(x坐标平移量,y坐标平移量)对坐标原点进行缩放
const ctx = wx.createCanvasContext('myCanvas')
ctx.strokeRect(10, 10, 150, 100)
ctx.translate(20, 20)
ctx.strokeRect(10, 10, 150, 100)
ctx.translate(20, 20)
ctx.strokeRect(10, 10, 150, 100)
ctx.draw()
 9.线条样式
①线条的宽度:ctx.setLineWidth(宽度px) 线条的端点样式:ctx.setLineCap('round'); 值:'butt'、'round'、'square'
onLoad: function() {
const ctx = wx.createCanvasContext('myCanvas');
//绘制线段
ctx.moveTo(10, 10);
ctx.lineTo(150, 10);
ctx.stroke();
//线条的端点样式:butt
ctx.beginPath();
ctx.setLineCap('butt');
ctx.setLineWidth(10);
ctx.moveTo(10, 30);
ctx.lineTo(150, 30);
ctx.stroke();
//线条的端点样式:round
ctx.beginPath();
ctx.setLineCap('round');
ctx.setLineWidth(10);
ctx.moveTo(10, 50);
ctx.lineTo(150, 50);
ctx.stroke();
//线条的端点样式:square
ctx.beginPath();
ctx.setLineCap('square');
ctx.setLineWidth(10);
ctx.moveTo(10, 70);
ctx.lineTo(150, 70);
ctx.stroke();
ctx.draw();
}
9.线条样式
①线条的宽度:ctx.setLineWidth(宽度px) 线条的端点样式:ctx.setLineCap('round'); 值:'butt'、'round'、'square'
onLoad: function() {
const ctx = wx.createCanvasContext('myCanvas');
//绘制线段
ctx.moveTo(10, 10);
ctx.lineTo(150, 10);
ctx.stroke();
//线条的端点样式:butt
ctx.beginPath();
ctx.setLineCap('butt');
ctx.setLineWidth(10);
ctx.moveTo(10, 30);
ctx.lineTo(150, 30);
ctx.stroke();
//线条的端点样式:round
ctx.beginPath();
ctx.setLineCap('round');
ctx.setLineWidth(10);
ctx.moveTo(10, 50);
ctx.lineTo(150, 50);
ctx.stroke();
//线条的端点样式:square
ctx.beginPath();
ctx.setLineCap('square');
ctx.setLineWidth(10);
ctx.moveTo(10, 70);
ctx.lineTo(150, 70);
ctx.stroke();
ctx.draw();
}
 ②线条的交点样式:ctx.setLineJoin('bevel') 值:'bevel'、'round'、'miter' 最大斜接长度:ctx.setMiterLimit(2) 斜接长度指的是在两条线交汇处内角和外角之间的距离。
当 setLineJoin() 为 miter 时才有效。超过最大倾斜长度的,连接处将以 lineJoin 为 bevel 来显示
const ctx = wx.createCanvasContext('myCanvas');
//绘制线段
ctx.beginPath();
ctx.moveTo(10, 10);
ctx.lineTo(100, 50);
ctx.lineTo(10, 90);
ctx.stroke();
ctx.beginPath();
ctx.setLineJoin('bevel');
ctx.setLineWidth(10);
ctx.moveTo(50, 10);
ctx.lineTo(140, 50);
ctx.lineTo(50, 90);
ctx.stroke();
ctx.beginPath();
ctx.setLineJoin('round');
ctx.setLineWidth(10);
ctx.moveTo(90, 10);
ctx.lineTo(180, 50);
ctx.lineTo(90, 90);
ctx.stroke();
ctx.beginPath();
ctx.setLineJoin('miter');
ctx.setLineWidth(10);
ctx.moveTo(130, 10);
ctx.lineTo(220, 50);
ctx.lineTo(130, 90);
ctx.stroke();
ctx.draw();
}
②线条的交点样式:ctx.setLineJoin('bevel') 值:'bevel'、'round'、'miter' 最大斜接长度:ctx.setMiterLimit(2) 斜接长度指的是在两条线交汇处内角和外角之间的距离。
当 setLineJoin() 为 miter 时才有效。超过最大倾斜长度的,连接处将以 lineJoin 为 bevel 来显示
const ctx = wx.createCanvasContext('myCanvas');
//绘制线段
ctx.beginPath();
ctx.moveTo(10, 10);
ctx.lineTo(100, 50);
ctx.lineTo(10, 90);
ctx.stroke();
ctx.beginPath();
ctx.setLineJoin('bevel');
ctx.setLineWidth(10);
ctx.moveTo(50, 10);
ctx.lineTo(140, 50);
ctx.lineTo(50, 90);
ctx.stroke();
ctx.beginPath();
ctx.setLineJoin('round');
ctx.setLineWidth(10);
ctx.moveTo(90, 10);
ctx.lineTo(180, 50);
ctx.lineTo(90, 90);
ctx.stroke();
ctx.beginPath();
ctx.setLineJoin('miter');
ctx.setLineWidth(10);
ctx.moveTo(130, 10);
ctx.lineTo(220, 50);
ctx.lineTo(130, 90);
ctx.stroke();
ctx.draw();
}
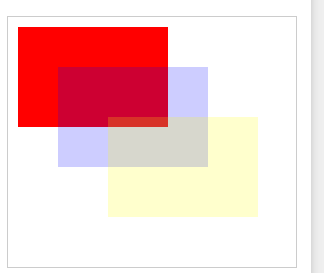
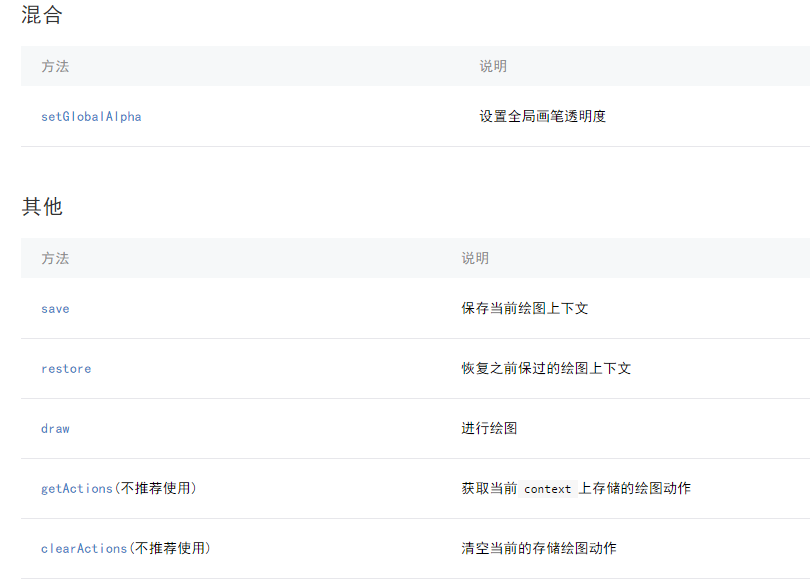
 10.全局画笔透明度:ctx.setGlobalAlpha(0.2)
Tip:这个只针对在ctx.setGlobalAlpha(0.2);背后的图形有影响,在它之前的,则没有影响
onLoad: function() {
const ctx = wx.createCanvasContext('myCanvas');
ctx.setFillStyle('red');
ctx.fillRect(10, 10, 150, 100);
ctx.setGlobalAlpha(0.2);
ctx.setFillStyle('blue');
ctx.fillRect(50, 50, 150, 100);
ctx.setFillStyle('yellow');
ctx.fillRect(100, 100, 150, 100);
ctx.draw();
}
10.全局画笔透明度:ctx.setGlobalAlpha(0.2)
Tip:这个只针对在ctx.setGlobalAlpha(0.2);背后的图形有影响,在它之前的,则没有影响
onLoad: function() {
const ctx = wx.createCanvasContext('myCanvas');
ctx.setFillStyle('red');
ctx.fillRect(10, 10, 150, 100);
ctx.setGlobalAlpha(0.2);
ctx.setFillStyle('blue');
ctx.fillRect(50, 50, 150, 100);
ctx.setFillStyle('yellow');
ctx.fillRect(100, 100, 150, 100);
ctx.draw();
}
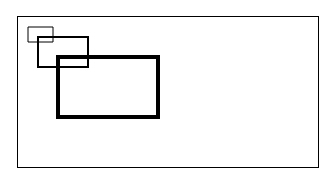
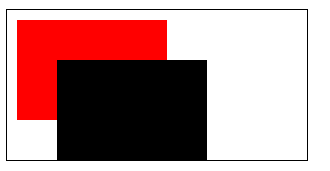
 11.保存/恢复
在绘制一个整体的元素,特别是使用了图像变换时头尾必须采用save(),restore() context.save();//保存 图像变换 设置状态 绘制(填充或是描边) context.restore();//恢复
const ctx = wx.createCanvasContext('myCanvas')
// save the default fill style
ctx.save()
ctx.setFillStyle('red')
ctx.fillRect(10, 10, 150, 100)
// restore to the previous saved state
ctx.restore()
ctx.fillRect(50, 50, 150, 100)
ctx.draw()
11.保存/恢复
在绘制一个整体的元素,特别是使用了图像变换时头尾必须采用save(),restore() context.save();//保存 图像变换 设置状态 绘制(填充或是描边) context.restore();//恢复
const ctx = wx.createCanvasContext('myCanvas')
// save the default fill style
ctx.save()
ctx.setFillStyle('red')
ctx.fillRect(10, 10, 150, 100)
// restore to the previous saved state
ctx.restore()
ctx.fillRect(50, 50, 150, 100)
ctx.draw()
|

【本文地址】
今日新闻 |
推荐新闻 |